
To lay out front yard landscaping successfully, begin with the routes people use, the main view of the house and the permanent features you cannot move. Mark the driveway, front door, pathways, utilities, windows, existing trees and drainage areas. Next, position the largest landscape elements, shape the planting beds and arrange plants in connected layers from tall to low. The goal is not to fill every empty patch. It is to create a clear, welcoming composition that guides visitors towards the entrance while making the house feel balanced, grounded and connected to its surroundings.
That sounds straightforward. Yet this is where many front yard projects go wrong.
People often visit a nursery, fall in love with ten unrelated plants and return home hoping the collection will somehow organise itself. It rarely does. The result is usually a row of undersized shrubs, isolated flowers floating in mulch and a pathway that seems disconnected from everything around it.
A better front yard begins with structure.
At Front Yard Landscaping Ideas, we recommend treating the space as the journey towards your home rather than simply a garden in front of it. Once that journey makes sense, the lawn, planting beds, trees, shrubs, lighting and decorative features become much easier to arrange.
Table of Contents
The Most Important Front Yard Landscaping Principle
Design the movement first. Arrange the plants second.
Your front yard has two jobs.
It must help people reach the entrance comfortably, and it must present the house in the best possible way. A beautiful flower bed cannot rescue an entrance that is difficult to find. Likewise, a perfectly practical path can still feel cold when it is surrounded by random planting.
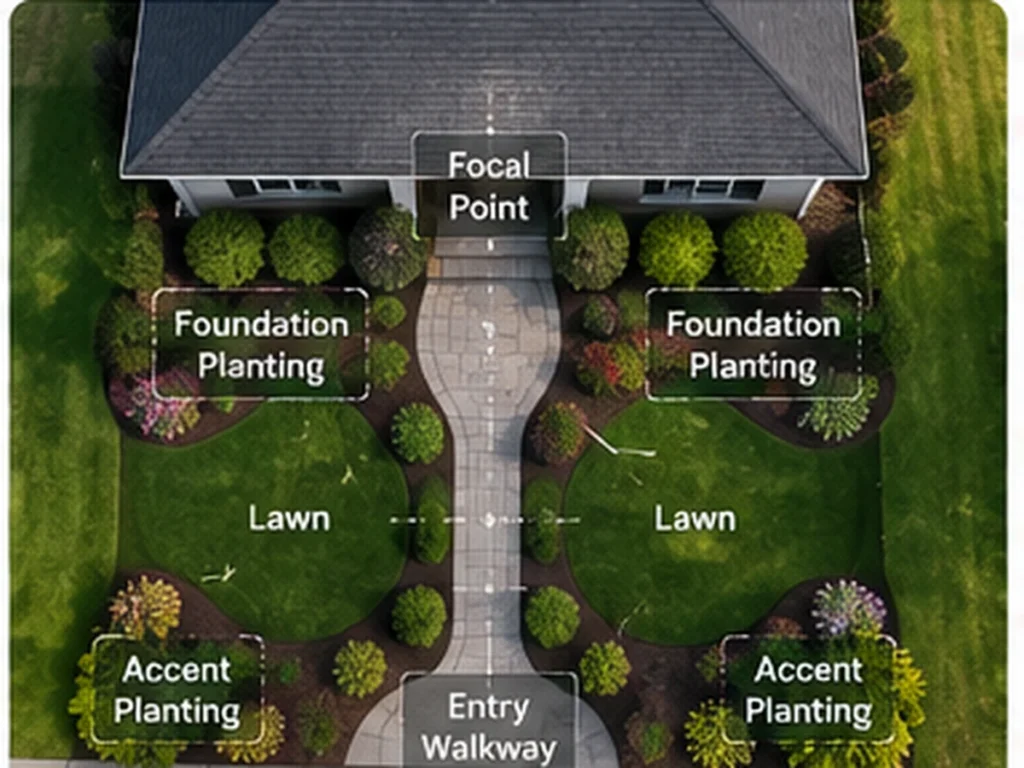
The strongest layouts combine:
- A clearly visible route to the front door.
- Planting beds that visually connect rather than appear isolated.
- Trees and shrubs that suit the scale of the house.
- Open sightlines around driveways and walkways.
- Plants selected for the actual sunlight, soil and moisture conditions.
- Enough repetition to make the design feel intentional.
- Seasonal interest without excessive maintenance.
Landscape design guidance consistently places walkways, driveways and steps among the most permanent and expensive elements of a front yard. Plants are easier to move or replace, which is why the hardscape and circulation pattern should be resolved first.
Think of Your Front Yard as Three Overlapping Maps
Before drawing beds or choosing plants, create three simple mental maps of the property.
The Movement Map
The movement map shows how people enter, cross and leave the yard.
Mark:
- The driveway.
- The public sidewalk.
- The front entrance.
- The mailbox.
- Side gates.
- Steps and changes in level.
- Routes used by delivery drivers.
- The path from parked cars to the door.
- Any shortcuts people already take across the lawn.
Pay attention to real behavior. People generally choose the quickest or easiest route, even when the official walkway goes somewhere else.
In one homeowner discussion, users warned that a planting bed positioned across the natural route from the street would encourage visitors to walk through the garden. They recommended observing these informal desire paths and either incorporating them or using planting to redirect movement clearly.
This is practical advice worth taking seriously. A path should not merely look attractive from above. It should make sense when someone is carrying groceries, pushing a stroller, delivering a package or arriving after dark.
The View Map
The view map identifies where the landscape will actually be seen.
Stand in several locations:
- At the curb.
- Across the street.
- At the driveway entrance.
- Beside a parked vehicle.
- At the front door.
- Inside the main front-facing windows.
- Near neighbouring properties.
Take a photograph from each position.
Most homeowners design from directly in front of the house. However, visitors usually approach from an angle. A tree that looks perfectly positioned from the sidewalk may block the entrance when seen from the driveway.
Professional front yard planning begins by evaluating the home from several viewpoints rather than relying on a single straight-on view.
The Site Conditions Map
The third map records what the property will allow.
Note:
- Full-sun, partial-sun and shaded areas.
- Dry and consistently damp locations.
- Roof runoff and downspout discharge.
- Low spots where water collects.
- Slopes and erosion-prone areas.
- Existing soil type.
- Compacted ground.
- Utility boxes and meters.
- Underground service lines.
- Property boundaries.
- Existing trees and root zones.
- Wind exposure.
- Reflected heat from walls, paving and driveways.
- Deer, rabbits or other browsing animals.
A proper site analysis considers light, water movement, climate, microclimates, wind, utilities, existing vegetation and wildlife before planting begins.
Do not treat this stage as unnecessary preparation. These conditions determine which plants will survive and which layout will remain practical.
Step 1: Measure the Front Yard and Draw a Base Map
You do not need professional landscape design software. Graph paper, a pencil and a tape measure are enough.
Draw the outline of the house and mark:
- Doors.
- Windows.
- Porch edges.
- Steps.
- Driveways.
- Walkways.
- Existing beds.
- Large trees.
- Air-conditioning equipment.
- Water spigots.
- Utility meters.
- Drainage structures.
- Property lines.
- Street and sidewalk edges.
Add measurements wherever possible.
A useful base map should include permanent structures as well as utility boxes, poles and meters because these features are costly to relocate and must remain accessible.
Make several copies of the map. You can then experiment with different planting bed shapes and pathways without redrawing the property each time.
A Simple DIY Measuring Method
Choose one corner of the house as your fixed reference point.
Measure from that corner to important features such as:
- The front door.
- The edge of the driveway.
- Existing trees.
- Walkway intersections.
- Utility boxes.
- The property boundary.
To locate a freestanding object accurately, such as a tree, measure its distance from two fixed points. This triangulation method helps place it correctly on the plan.
Precision matters most around permanent structures. The shape of a flower border can remain flexible.
Step 2: Decide What the Front Yard Must Do
A landscape should support your household rather than copy a picture that was designed for someone else.
Ask yourself:
- Do children need an open lawn?
- Do you want a lower-maintenance front yard?
- Is privacy important?
- Does the property need shade?
- Do you frequently receive deliveries?
- Would you like to attract pollinators?
- Does stormwater collect near the house?
- Do you need an accessible route without steps?
- Are you willing to prune shrubs regularly?
- How much watering can you realistically provide?
- Do you want year-round structure or mainly seasonal colour?
- Will you complete the project at once or in phases?
Be honest about maintenance.
A highly layered cottage garden can look wonderful, but it may require dividing perennials, pruning, deadheading, weeding and seasonal clean-up. A restrained design using evergreen shrubs, ornamental grasses and groundcovers may be easier to manage.
Low maintenance does not mean no maintenance. It means choosing a layout that avoids unnecessary work.
Step 3: Establish a Clear Route to the Front Door
The entrance should be visually obvious before someone reaches the property.
A visitor should not have to stop and work out:
- Where the path begins.
- Which door is the main entrance.
- Whether to walk up the driveway.
- Whether a narrow stepping-stone route is intended for guests.
- Whether plants can be stepped over.
- Where the pathway continues after dark.
Straight or Curved Walkway
A straight walkway is often appropriate when:
- The front door aligns with the street.
- The architecture is formal or symmetrical.
- The yard is narrow.
- Direct access is the priority.
- The path is relatively short.
A curved walkway works better when:
- The entrance is offset.
- The driveway provides the main arrival point.
- The yard is wide enough to accommodate a meaningful curve.
- A tree, slope or existing feature must be avoided.
- The home has an informal architectural style.
Curves should have a reason. A path that wiggles across a small yard without responding to the terrain, entrance or planting often feels artificial.
Well-planned paths follow natural access patterns. Landscape guidance also recommends making curves, changes in direction or steps purposeful rather than adding them merely for decoration.
Make the Path Feel Connected
A walkway feels integrated when the surrounding landscape supports it.
You can achieve this by:
- Softening one or both edges with low planting.
- Repeating the walkway material in the porch, edging or garden details.
- Adding a wider landing where the path meets the driveway.
- Positioning lighting near changes in direction.
- Using an accent plant near the entrance.
- Keeping thorny, floppy or wide-spreading plants away from the walking surface.
- Leaving enough open space for two people to walk comfortably where possible.
Avoid planting identical shrubs in a rigid line along the entire path unless the architecture calls for strong formality. A path should be framed, not trapped.
Step 4: Learn How to Align a Front Yard Landscape with the House
When people ask how to align front yard landscape features, they are usually trying to solve one of two problems.
Either the landscaping looks detached from the architecture, or one side of the property feels visually heavier than the other.
Landscape alignment does not mean placing every tree and shrub in a perfectly straight line. It means connecting the visual structure of the yard to the lines, proportions and focal points of the house.
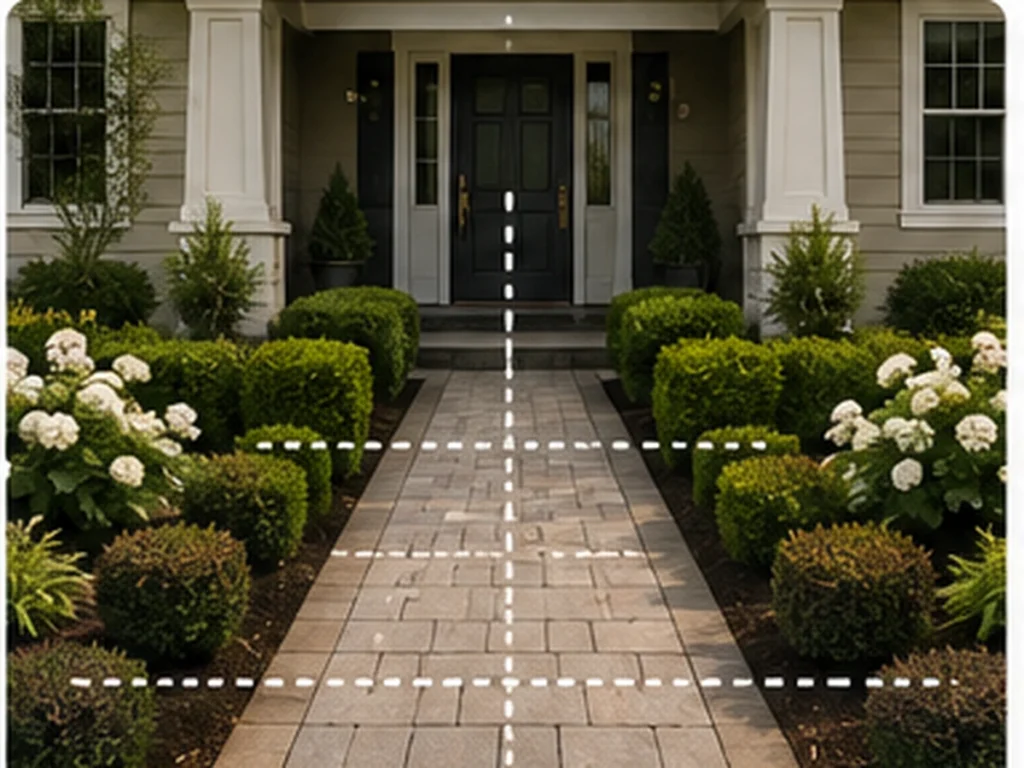
Use the Front Door as the Primary Focal Point
The front door is normally the visual destination.
Support it with:
- A clear walkway.
- A pair of containers.
- One distinctive shrub or small ornamental tree.
- Coordinated porch lighting.
- Lower planting near the approach.
- A slight opening in the foundation planting.
Avoid surrounding the entrance with plants that hide the door or make the approach feel narrow.
The closer visitors move towards the entrance, the simpler and clearer the composition should become.
Respond to Architectural Lines
Look for strong lines in the building:
- Roof ridges.
- Porch columns.
- Window groups.
- Garage edges.
- Chimneys.
- Steps.
- Horizontal siding.
- Masonry bands.
Use plants to reinforce or soften these features.
For example:
- Upright plants can relate to tall windows or columns.
- Broad, rounded shrubs can soften a long horizontal wall.
- A small tree can visually balance a garage-heavy façade.
- Low planting can preserve attractive masonry.
- Taller corner planting can soften abrupt building edges.
Use Scale Rather Than Habit
Foundation shrubs are often selected because they are familiar, not because they suit the building.
A single-story cottage can be overwhelmed by tall shrubs. A two-story home can look exposed when surrounded only by ankle-high flowers.
Scale describes the visual relationship between the home and the landscape. Large homes usually need larger planting masses and strategically positioned trees. Smaller homes benefit from restrained plant sizes and fewer competing focal points.
Plants near the house should enhance its proportions rather than hide its architecture. Overgrown foundation planting can obscure windows, crowd pathways and weaken the character of the façade.
Balance Does Not Always Mean Symmetry
A symmetrical home may suit matching beds or paired entrance plants.
An asymmetrical home usually needs visual balance rather than duplication.
Imagine a scale.
A large garage, dark evergreen tree or tall section of the building creates visual weight. You can balance it with a group of smaller shrubs, an ornamental tree or a broader planting bed on the opposite side.
The two sides do not need to match. They need to feel equally resolved.
Step 5: Draw the Main Planting Bed Shapes
Planting beds should connect the house, walkway and lawn.
Avoid drawing a narrow strip that follows the foundation at exactly the same width from one end to the other. These beds often look like borders added after the house was built rather than part of a considered landscape.
Instead, create beds that:
- Widen near important corners.
- Narrow where views should remain open.
- Connect to the entrance planting.
- Relate to the walkway.
- Include existing trees where appropriate.
- Follow the scale of the property.
- Allow plants enough room to reach mature size.
Use Long, Confident Bed Lines
Tiny curves create visual noise and make mowing difficult.
A better bed edge generally uses:
- One broad curve.
- A restrained series of connected curves.
- Straight geometric lines for modern homes.
- Sweeping informal lines for cottage or naturalistic landscapes.
Lay a garden hose or rope on the lawn to test the proposed shape.
Walk towards the house, view it from the street and adjust the line until it appears deliberate. Then mow around it once before removing any turf. This simple test reveals whether the shape is practical.
Connect Isolated Beds
Several small beds scattered across the lawn can make a front yard look fragmented.
Where possible, combine them into larger planting areas.
A connected bed:
- Creates stronger visual impact.
- Makes plant repetition easier.
- Reduces awkward mowing corners.
- Allows plants to form communities.
- Makes mulch and irrigation more efficient.
- Produces a more established appearance.
This does not mean every planting must become one enormous border. The objective is to avoid unrelated islands that compete for attention.
Step 6: Position the Largest Landscape Elements First
Do not begin with flowers.
Place elements in order of visual and physical importance:
- Existing mature trees.
- New shade or canopy trees.
- Ornamental or specimen trees.
- Large screening shrubs.
- Structural evergreen shrubs.
- Medium flowering shrubs.
- Perennials and ornamental grasses.
- Groundcovers.
- Seasonal annuals.
- Decorative accents.
Trees and large shrubs define the long-term framework of the yard. They can frame the house, create shade, mark boundaries and soften the roofline.
Where to Position a Front Yard Tree
A front yard tree may work well:
- Off one corner of the house.
- Between the street and house without blocking the entrance.
- Near a broad lawn area.
- As a visual counterweight to a garage.
- At the outer edge of the property to frame the view.
- Near a seating area where shade is useful.
Avoid placing a tree:
- Directly in front of the entrance.
- Where its mature canopy will block important sightlines.
- Too close to the foundation.
- Under overhead utilities unless its mature height is suitable.
- Where roots will conflict with paving or drainage infrastructure.
- In a location that blocks vehicles from seeing pedestrians.
Always design with the mature canopy and root area in mind, not the size of the tree at the nursery.
Step 7: Arrange Plants in Layers
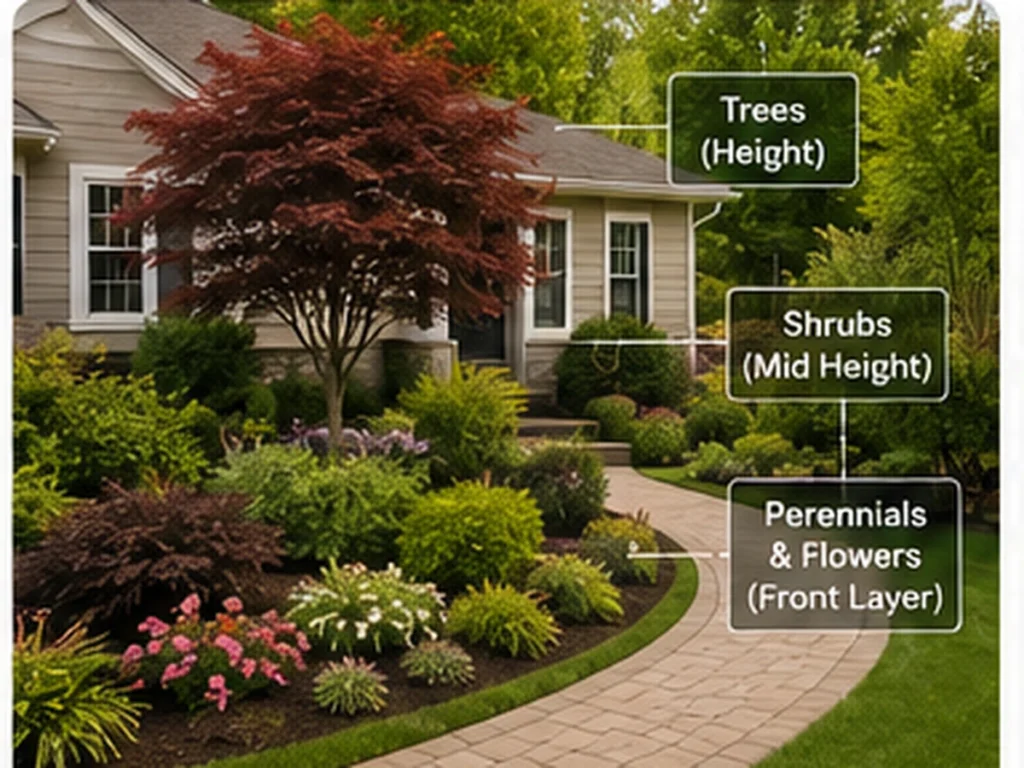
Plant layering gives a front yard depth.
Without layers, landscaping can appear flat, even when it contains attractive plants.
The Basic Planting Layers
A typical border may include:
- Background layer: small trees, tall shrubs or screening plants.
- Structural layer: evergreen or long-season shrubs.
- Middle layer: flowering shrubs, grasses and medium perennials.
- Foreground layer: compact perennials and low groundcovers.
- Seasonal layer: bulbs and annual colour woven through the design.
The tallest plants are usually positioned towards the back, but the arrangement should not resemble stadium seating. Bring occasional upright plants forward and allow some lower plants to drift deeper into the bed.
Research-based landscape design guidance recommends creating both vertical and horizontal layers. Plant masses should overlap and interlock from the front of a bed to the back rather than sitting in isolated rows.
Keep Windows and Entrances Open
Foundation plants should frame windows rather than cover them.
A practical arrangement might include:
- Taller shrubs or small trees near blank wall sections.
- Medium shrubs beneath higher windows.
- Low plants below windows with low sills.
- Open space near utility access.
- Compact planting beside steps.
- A distinctive accent near the entrance.
Check mature plant height before buying. A shrub labelled as compact can still become much larger than expected.
Step 8: Arrange Plants in Masses, Not Isolated Dots
One of the most common DIY landscaping mistakes is buying one of everything.
A single hosta here, one ornamental grass there and a lonely flowering shrub at the far end might provide variety, but it rarely creates cohesion.
Instead, repeat plants in groups.
Depending on plant size and the character of the design, use:
- Three or more of a small perennial.
- A broad sweep of one groundcover.
- Repeated clusters of the same ornamental grass.
- Two or three substantial shrubs forming one mass.
- A repeated evergreen used in separate areas to connect the property.
Similar plants should be spaced according to their mature spread so they eventually read as a connected mass. Plant groups can then overlap visually, creating flow through the bed.
Homeowner discussions frequently reach the same conclusion. Forum users often advise against isolated plants surrounded by large areas of mulch, recommending broader, connected groups that give the landscape a more settled and intentional appearance.
Use the Repetition Rule
Choose a limited set of dependable plants and repeat them throughout the yard.
You might repeat:
- One evergreen shrub.
- One ornamental grass.
- One long-flowering perennial.
- One groundcover.
- One accent colour.
- One paving or edging material.
Repetition creates rhythm. It moves the eye through the landscape and makes different planting beds feel related.
Variety should appear within a framework, not replace the framework.
Step 9: Choose a Controlled Colour and Texture Palette
Colour attracts attention, which means it should be used deliberately.
A simple front yard palette might include:
- Green foliage as the permanent base.
- White flowers near the entrance.
- Purple and blue perennials throughout the beds.
- Warm seasonal colour in a small number of containers.
Another property might use burgundy foliage, pale pink flowers and silver-leaved plants.
The exact colours matter less than consistency.
Match Colour to the House
Consider:
- Brick colour.
- Roof colour.
- Siding.
- Trim.
- Front door.
- Paving.
- Stonework.
A red-brick house may already have strong warmth. Adding too many unrelated orange, yellow and magenta flowers can create visual competition. Cooler flowers, white blooms and deep green foliage may provide contrast.
A pale or neutral façade can support stronger colours, although repeating one accent is usually more effective than using every colour available.
Use Texture for Year-Round Interest
Texture comes from:
- Leaf size.
- Leaf shape.
- Bark.
- Branching structure.
- Grass blades.
- Seed heads.
- Evergreen foliage.
- Stone and paving.
Combine fine, medium and bold textures.
For example, broad hosta leaves appear more distinctive beside fine-textured grasses. A clipped evergreen looks stronger beside loose flowering perennials.
Texture is especially important outside the flowering season.
Step 10: Select Plants for the Site, Not Just the Style
The most elegant planting plan will fail when the plants are unsuitable for the conditions.
Before purchasing a plant, confirm:
- Mature height.
- Mature width.
- Sunlight requirement.
- Soil preference.
- Drainage requirement.
- Cold tolerance.
- Heat tolerance.
- Water needs.
- Growth rate.
- Pruning requirements.
- Pest or disease concerns.
- Potential invasiveness.
- Whether it is toxic or thorny.
- Local wildlife pressure.
In the United States, the USDA Plant Hardiness Zone Map helps gardeners estimate which perennial plants are likely to tolerate local average winter minimum temperatures. It is a useful starting point, although sunlight, soil, heat and microclimates must still be considered.
Group Plants with Similar Needs
Do not place a moisture-loving perennial beside a drought-tolerant shrub and expect one irrigation schedule to suit both.
Create hydrozones by grouping plants that require similar amounts of water. This reduces overwatering and underwatering while making irrigation easier to manage.
A front yard might contain:
- A dry, sunny bed beside the driveway.
- A moderate-water foundation border.
- A shaded bed beneath a tree.
- A rain garden in a low area.
- A functional lawn zone.
Treat each as a separate planting environment.
Consider Native and Regionally Appropriate Plants
Native plants are not automatically maintenance-free, and not every native species suits every residential site. However, regionally appropriate plants are often better adapted to local climate and soil conditions.
The best approach is to combine ecological suitability with strong landscape structure.
Choose native plants that offer:
- A tidy or intentional growth habit.
- Appropriate mature size.
- Seasonal flowers or fruit.
- Attractive foliage.
- Wildlife value.
- Compatibility with neighbouring plants.
A naturalistic yard still needs edges, pathways, repetition and visible organisation. Intentional design helps a wildlife-friendly landscape look cared for rather than abandoned.
Step 11: Build Year-Round Structure Before Seasonal Colour
Imagine your front yard in the least colourful month of the year.
What remains?
A successful layout still has:
- A visible entrance.
- Clear bed edges.
- Evergreen structure.
- Attractive tree forms.
- Grasses or perennials with persistent seed heads.
- Groundcover.
- Defined pathways.
- Interesting bark or branches.
- A balanced relationship with the house.
Seasonal flowers should enrich the framework, not become the framework.
A Reliable Planting Ratio
There is no universal mathematical formula, but a practical front yard composition generally needs more structural plants than short-lived seasonal displays.
Build the design around:
- Trees and large shrubs for scale.
- Evergreen or long-season plants for stability.
- Flowering shrubs and perennials for changing interest.
- Groundcovers and mulch for soil coverage.
- Annuals and containers for flexible accents.
Containers are particularly useful near the front door because their colour can be changed without disturbing the permanent layout.
Step 12: Plan the Soil, Drainage and Watering System
Plant health begins below the mulch.
A soil test can reveal pH, nutrient conditions, composition and organic matter. Compacted clay, very sandy soil and extreme pH may significantly limit which plants will grow successfully.
Watch Water Before Changing the Grade
Observe the yard during heavy rain.
Look for:
- Water flowing towards the foundation.
- Downspouts emptying into planting beds.
- Puddles beside walkways.
- Erosion on slopes.
- Water crossing the driveway.
- Soggy lawn areas.
- Sediment collecting at low points.
Do not hide a drainage problem beneath plants.
Depending on the site, the solution may involve:
- Downspout extensions.
- Regrading.
- A shallow swale.
- Permeable paving.
- A dry creek bed.
- A professionally designed drainage system.
- A rain garden positioned in a suitable area.
Rain gardens can capture runoff and allow water to soak into the ground, but they must be positioned and constructed correctly. They should not be used as an improvised solution beside a vulnerable foundation.
Use Mulch as Part of the Design
Mulch visually unifies beds while reducing exposed soil.
It can also:
- Slow moisture loss.
- Moderate soil temperature.
- Limit weed germination.
- Reduce erosion.
- Protect soil from crusting.
- Give new plantings a finished appearance.
The EPA notes that mulch can reduce evaporation, inhibit weeds, limit erosion and moderate soil temperature.
Avoid piling mulch against tree trunks or shrub stems. Leave the plant base visible.
Step 13: Keep Utilities and Maintenance Access Clear
Landscape plans often ignore the least attractive parts of a property.
These include:
- Electrical boxes.
- Gas meters.
- Water meters.
- Cable boxes.
- Air-conditioning units.
- Cleanouts.
- Drain covers.
- Irrigation valves.
- Fire hydrants.
You can soften the view with plants, but do not block access.
Use plants that can be maintained without interfering with equipment. Leave enough working space for technicians and avoid species with thorns around access points.
Before digging, arrange for underground utility lines to be identified. In the United States, 811 provides a before-you-dig service for projects including tree and shrub planting. Other countries and regions have their own utility-location services.
How to Arrange Front Yard Landscaping by Functional Zone
Breaking the property into zones makes a complex yard easier to design.
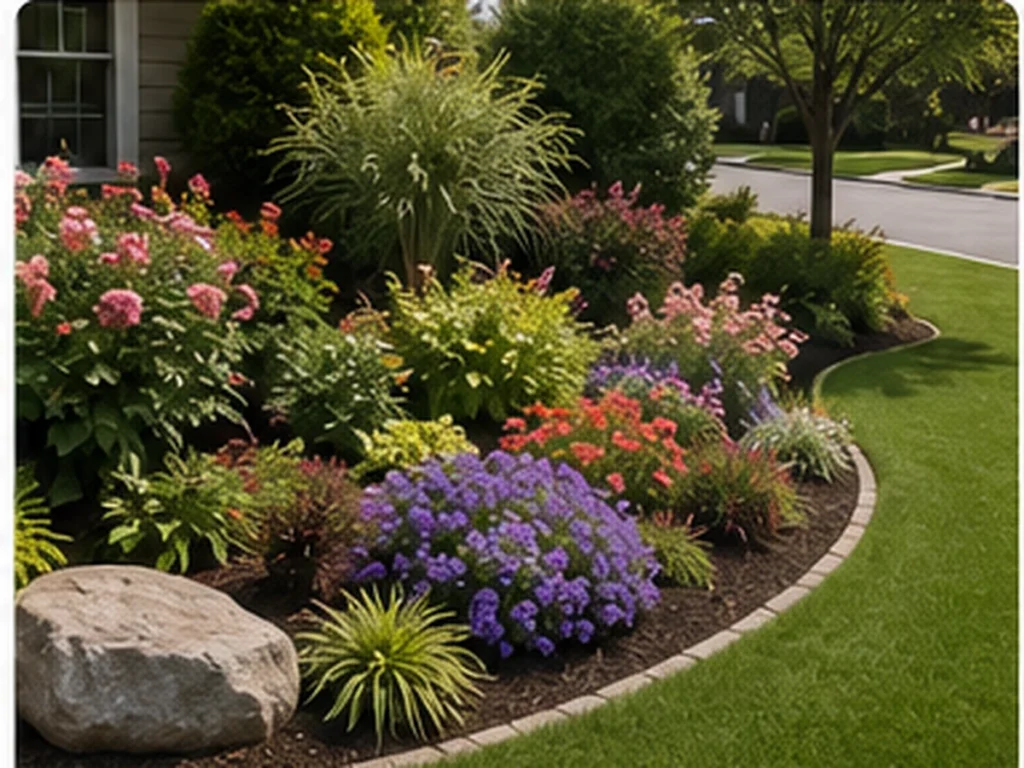
The Foundation Zone
Purpose:
- Connect the house to the ground.
- Soften large wall areas.
- Frame architectural features.
- Add year-round structure.
Suitable elements:
- Compact evergreen shrubs.
- Flowering shrubs.
- Shade-tolerant perennials.
- Groundcovers.
- Small ornamental trees near corners.
Avoid:
- Shrubs that will cover windows.
- Tree roots too close to structures.
- Deep beds that block maintenance access.
- Tall planting beside low windows.
The Entrance Zone
Purpose:
- Identify the front door.
- Create a welcoming arrival.
- Provide colour and detail at close range.
Suitable elements:
- Containers.
- Fragrant plants.
- One accent shrub.
- Low edging plants.
- Subtle pathway lighting.
- A small bench where space permits.
Avoid:
- Thorny plants.
- Plants that flop across the path.
- Dense shrubs that create hiding places.
- Too many competing decorative items.
The Driveway Zone
Purpose:
- Mark the entrance.
- Soften large areas of paving.
- Maintain driver and pedestrian visibility.
Suitable elements:
- Low ornamental grasses.
- Tough groundcovers.
- Compact shrubs.
- A broad planting bed where vehicle doors will not damage plants.
Avoid:
- Tall plants near the street.
- Brittle shrubs beside parking areas.
- Plants that require frequent watering against hot pavement.
- Narrow strips that are difficult to irrigate.
The Street-Edge Zone
Purpose:
- Create curb appeal.
- Connect the private yard with the streetscape.
- Manage difficult conditions near sidewalks or roads.
Suitable elements:
- Drought-tolerant perennials.
- Low shrubs.
- Groundcovers.
- Rain-tolerant planting where runoff collects.
- A clear access point from the street.
Avoid:
- Plants that block visibility.
- Species damaged by road salt where that is a concern.
- Tall plants around intersections.
- Beds that force people to step through planting.
The Lawn or Open-Space Zone
Purpose:
- Provide visual breathing room.
- Support play or flexible use.
- Contrast with planted areas.
- Preserve open views.
Keep lawn where it has a function.
An unused strip of turf on a steep slope or narrow side section may create more maintenance than value. Groundcover, shrubs or a planted slope may be more practical.
Sample Front Yard Layouts
Layout for a Small Front Yard
Use:
- One clear entrance path.
- One connected foundation bed.
- A limited palette of four to six plant types.
- One small ornamental tree, where appropriate.
- Low foreground planting.
- Vertical elements near blank walls.
- A small amount of functional lawn or no lawn.
Avoid miniaturising everything. One confident planting mass often makes a small yard feel larger than many tiny features.
Layout for a Wide Single-Story House
Use:
- Broad planting beds.
- Horizontal plant masses.
- Taller planting near the outer corners.
- A medium tree to balance the width.
- Repeated shrub groups.
- A clear focal point at the entrance.
A long house surrounded by a thin strip of small shrubs can look even wider. Deeper beds and substantial plant masses create better proportion.
Layout for a Two-Story House
Use:
- One or two appropriately scaled trees.
- Large shrubs positioned away from windows.
- Layered foundation beds.
- Strong entrance planting.
- Repetition across the width of the façade.
The landscape needs enough visual height to connect the ground plane with the upper level.
Layout for a Sloped Front Yard
Use:
- Planting arranged along contours.
- Groundcovers or deep-rooted plants.
- Terraced beds where professionally appropriate.
- Steps located on the most logical route.
- Retaining structures designed for actual soil pressure.
- Drainage planning before decorative work.
Avoid placing shallow mulch over an erosion problem. Stabilise the slope first.
Layout for a No-Lawn Front Yard
Use:
- A visible pathway.
- Clear bed boundaries.
- Repeated plant masses.
- Groundcovers.
- Gravel or permeable surfaces where locally suitable.
- One or two open areas that provide visual rest.
- A strong tree and shrub framework.
- Plants grouped by water needs.
A lawn-free yard should not feel like every square foot has been filled. Open gravel, mulch, paving or low groundcover can create the breathing space previously provided by turf.
Common Front Yard Layout Mistakes
Buying Plants Before Drawing the Layout
This creates a plant collection rather than a landscape.
Choose locations and required plant characteristics first. Select exact species afterwards.
Making Beds Too Narrow
Shallow beds force shrubs into tight rows and leave no room for layering.
Draw beds according to mature plant width, not the size of plants in their nursery containers.
Planting Too Close to the House
Small plants create false confidence.
Allow for mature width, air movement, maintenance access and roof runoff.
Blocking the Front Door
The entrance should remain the primary destination.
Move large shrubs away from the approach and use lower planting to open the view.
Using Too Many Plant Varieties
Excessive variety creates visual noise and complicated maintenance.
Repeat dependable plants and reserve unusual species for focal points.
Ignoring Mature Size
A tree or shrub that looks perfectly proportioned on planting day may eventually cover a window, narrow a walkway or overwhelm the house.
Read mature height and spread information before purchasing.
Drawing Nervous Bed Edges
Small, repetitive curves appear accidental and are difficult to maintain.
Use longer lines and fewer directional changes.
Filling Every Empty Space
Empty space is not automatically a problem.
Lawns, low groundcover, gravel and open mulch areas can give the eye somewhere to rest.
Forgetting the Winter or Dry-Season View
A yard designed entirely around flowers may disappear visually outside its peak season.
Add evergreen foliage, bark, grasses, seed heads and clear hardscape lines.
Hiding Problems Instead of Solving Them
Plants cannot permanently solve:
- Poor drainage.
- Unstable retaining walls.
- Damaged paving.
- Incorrect grading.
- Unsafe steps.
- Inaccessible utilities.
Resolve infrastructure first.
What Homeowner Forums Reveal About Front Yard Design
Forum discussions are useful because they show what people notice after a landscape has been installed.
Several themes appear repeatedly.
People Will Create Their Own Route
When a walkway is inconvenient, visitors cut across the lawn or planting beds. A successful layout respects actual movement rather than forcing people to follow an ornamental route.
Random Plants Rarely Look Established
Homeowners often receive the same advice: stop scattering individual plants and build larger connected groups. Repetition and mass planting make a landscape look calmer and more intentional.
Bed Edges Matter More Than Expensive Accessories
A clean, confident edge can make an ordinary yard feel organised. Conversely, scattered stones, disconnected mulch patches and improvised borders can make good plants look unfinished.
Visualisation Prevents Expensive Mistakes
People increasingly photograph their homes, sketch planting masses over printed images or use visualisation tools before buying plants.
The exact tool is less important than the exercise. Test the height and width of future plants visually before spending money.
Cohesion Usually Beats Novelty
Most unsuccessful yards do not lack interesting plants. They lack relationships between those plants.
A repeated grass, shrub or flower often contributes more to the design than another new variety.
A Practical Plant Placement Method
When you are ready to position plants, leave them in their containers.
Start with the largest plants.
Place:
- Trees.
- Large shrubs.
- Structural evergreen plants.
- Medium shrubs.
- Repeated perennial groups.
- Groundcovers.
- Seasonal accents.
Then walk away.
View the arrangement from:
- The street.
- The driveway.
- The front door.
- Inside the house.
Check whether:
- The entrance remains visible.
- Plant groups overlap visually.
- One side feels too heavy.
- The spacing reflects mature size.
- The colour palette is repeated.
- Utility access remains open.
- Plants near paths will stay compact.
- The design has a clear focal point.
- There is enough open space.
Staging plants in their pots before installation is recommended because it allows the composition to be adjusted before planting.
Leave the pots in place for a day when possible. Morning and afternoon light may reveal problems that were not obvious at the nursery.
How to Phase a Front Yard Landscaping Project
You do not need to complete everything at once.
Phase 1: Correct the Infrastructure
Complete:
- Drainage work.
- Grading.
- Utility identification.
- Walkway repairs.
- Step repairs.
- Retaining walls.
- Irrigation sleeves beneath future paving.
- Removal of hazardous plants or trees.
Phase 2: Install the Main Structure
Add:
- Trees.
- Large shrubs.
- Main planting beds.
- Primary pathways.
- Lawn or lawn replacement areas.
- Irrigation.
Phase 3: Add Supporting Plants
Install:
- Medium shrubs.
- Perennials.
- Ornamental grasses.
- Groundcovers.
- Mulch.
- Edging.
Phase 4: Add Finishing Details
Complete the design with:
- Containers.
- Lighting.
- House numbers.
- A bench.
- Decorative stone.
- Seasonal colour.
Install permanent and slow-growing elements first. Smaller plants can be added as the budget allows.
Front Yard Layout Checklist
Before planting, confirm that:
- The front door is easy to identify.
- The pathway follows a natural route.
- The driveway has safe sightlines.
- Bed shapes look clear from the street.
- Trees are positioned according to mature size.
- Windows will remain visible.
- Large plants balance the scale of the house.
- Planting masses connect visually.
- Key plants are repeated.
- Plants match the sunlight and soil conditions.
- Plants with similar water needs are grouped.
- Drainage problems have been addressed.
- Utility equipment remains accessible.
- Underground services have been located.
- The design retains some visual breathing room.
- The landscape will still have structure outside the flowering season.
- The maintenance requirements suit your available time.
- Plants have been staged before installation.
Conclusion
Learning how to arrange front yard landscaping is less about memorising design rules and more about establishing the correct order of decisions.
Begin with the house, the entrance and the way people move. Record the site conditions. Draw confident planting beds. Position trees and structural shrubs before selecting flowers. Arrange plants in connected layers and repeat them across the yard so the design feels unified.
Most importantly, design for the landscape you will have in five or ten years, not the collection of small nursery plants you bring home today.
A thoughtful front yard does not need to be extravagant. It needs a clear route, appropriate scale, healthy plants and enough repetition to appear intentional. When those foundations are right, even a modest landscape can feel welcoming, balanced and deeply connected to the home.
Frequently Asked Questions
How do I lay out my front yard landscaping?
Start by drawing the house, driveway, front path, existing trees, utilities and property boundaries. Mark sunlight, drainage and natural walking routes. Position the pathway and largest plants first, then create planting beds and arrange shrubs, perennials and groundcovers in connected layers.
How do I arrange plants in a front yard?
Place taller structural plants towards the back or near building corners, medium shrubs and grasses through the middle, and lower perennials or groundcovers near the front. Repeat plants in groups and allow neighbouring plant masses to overlap visually at maturity.
How do I align front yard landscape features with my house?
Use the front door as the main focal point and respond to architectural lines such as windows, columns, rooflines and garage edges. Choose plants that match the scale of the building and use either symmetry or balanced asymmetry depending on the architecture.
Should front yard landscaping be symmetrical?
Symmetry works well for formal homes with centred entrances and matching architectural features. Asymmetrical homes usually look better with visual balance, where different plants or features create similar visual weight without matching exactly.
What should I plant first in a front yard?
Plant trees and large structural shrubs first because they define the long-term framework. Add medium shrubs, perennials, grasses, groundcovers and seasonal flowers afterwards.
How far should landscaping be from the house?
The correct distance depends on each plant’s mature width, root habit and maintenance requirements. Choose plants that can reach their natural size without covering windows, trapping moisture against the building or blocking access.
How can I make my front yard look professionally landscaped?
Use broad planting beds, clean edges, a limited plant palette, repeated plant groups, clear pathways and a strong focal point at the entrance. Avoid isolated plants, excessive decorative objects and too many small bed shapes.
How do I make a small front yard look bigger?
Use fewer plant varieties, longer bed lines, one strong focal feature and lower planting near important views. Repetition and connected plant masses generally create a calmer, more spacious appearance than many small features.
Should I use curves or straight lines in my front yard?
Use straight lines for formal, modern or narrow spaces. Use broad curves when they respond to a wide yard, offset entrance, slope or existing tree. Avoid unnecessary curves that make the route longer without improving the design.
How do I landscape around a front walkway?
Use low, compact plants that will not obstruct movement. Repeat a limited number of plants, leave additional space at corners and entrances, and avoid thorny or floppy species. The planting should soften and guide the walkway without narrowing it.
How can I landscape a front yard with little maintenance?
Choose plants suited to the local climate, sunlight and soil. Use shrubs and groundcovers with appropriate mature sizes, group plants by watering needs, reduce awkward lawn areas and limit the number of plant varieties. Add mulch and efficient irrigation where needed.
Can I design my front yard without professional software?
Yes. A measured sketch on graph paper is sufficient for many residential projects. Mark permanent features, draw planting bed shapes and use circles representing mature plant widths. You can also photograph the house and sketch planting masses over the image.
What is the biggest front yard landscaping mistake?
The most damaging mistake is choosing plants before understanding the site and creating the overall layout. This often leads to poor spacing, blocked windows, disconnected beds, unsuitable plants and unnecessary replacement costs.
How much empty space should a front yard have?
There is no fixed percentage. The landscape needs enough open lawn, groundcover, paving, gravel or low planting to prevent the composition from feeling crowded. Empty space helps highlight important plants and keeps the entrance visually clear.
How can I make a new front yard look established?
Use fewer varieties in larger groups, choose some plants with immediate structural presence and fill gaps temporarily with perennials or annuals. Space permanent plants according to mature size rather than overcrowding them for instant fullness.

Sara Bendrick believes your yard should be a place you actually look forward to coming home to. A licensed and bonded design-build contractor (C-27 #1006161), she founded Sarita Landscape Designs and has spent over twelve years designing residential outdoor spaces across Southern California with a real soft spot for curb appeal and low-water, no-lawn designs.
When she’s not on a job site, Sara’s on camera or on stage. She’s hosted yard-renovation shows including I Hate My Yard, Build It Like Bendrick, and Lawn & Order, written Big Impact Landscapes, given two TEDx talks, and serves as a spokesperson for Stihl. Her mission is simple, help people see the potential in the yard they already have.