
To plan front yard landscaping, start with a site analysis of sunlight, shade, soil type, and drainage, then measure your property and draw a base map to scale on graph paper. Decide what the space must do before you decide how it should look, because the walkway, driveway, and entry approach control everything else. Match the landscape style to your home architecture, apply the design principles of unity, balance, proportion, and emphasis, and place your hardscape first. Only after that should you build a planting plan in layers, using trees, shrubs, perennials, and ground cover sized for their mature spread. Finish by planning irrigation, mulch, lighting, and maintenance, then phase the budget over one to three seasons.
That is the short version. The rest of this guide breaks each stage down properly, so you end up with a front yard landscape plan you can actually build from, rather than a shopping cart full of plants that never quite fit together.
Table of Contents
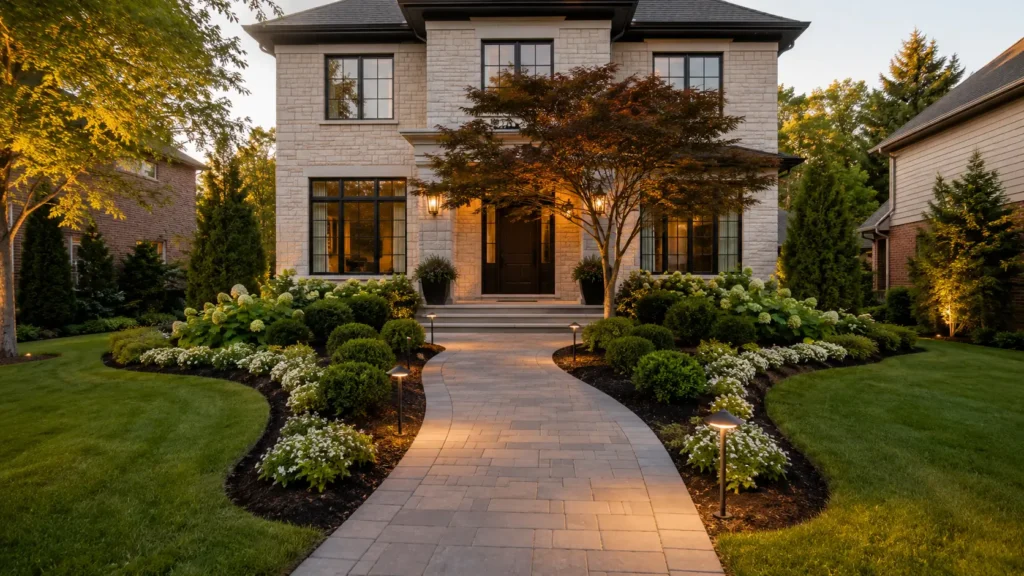
What a Front Yard Landscape Plan Actually Is
A front yard landscape plan is a scaled drawing of everything between your property line and your front door. It is not a plant list. It shows the house footprint, the driveway, the walkway, the bed lines, the existing trees you are keeping, the utility locations, and the new elements you want to add, all drawn in correct proportion to one another.
This matters because the front yard is the public face of the property. The backyard is where most homeowners spend their money. The front is usually left with whatever the builder installed on handover day. Good landscape plans for front of house close that gap. They treat the approach from the street as a designed sequence rather than a leftover strip of lawn.
There is also a practical reason to draw before you dig. A plan on paper costs nothing to change. A hedge planted three feet too close to the foundation costs a weekend and a sore back to fix, and that is assuming you notice the problem in year one rather than year four.
Step One: Run a Site Analysis Before You Buy a Single Plant
Every good design starts with observation, not inspiration. Spend a week paying attention to the space you already have.
Track the light. Note where the sun hits at nine in the morning, at one in the afternoon, and at five in the evening. Full sun means six or more hours of direct light. Partial sun sits between three and six. Anything less is shade. This single measurement eliminates half the plants on the nursery bench and saves you from the classic mistake of putting a sun lover under a mature canopy.
Read the drainage. Walk the yard after heavy rain. Where does water pool? Where does it run off toward the foundation? Low spots that stay wet for more than a day need either regrading, a French drain, or plants that tolerate wet feet.
Test the soil. Sandy soil drains fast and holds few nutrients. Clay holds water and compacts. A simple soil test tells you the pH level and what is missing, and amending with compost fixes more problems than any fertilizer will.
Know your zone and microclimate. Your hardiness zone tells you what survives winter. Your microclimate tells you the rest. A south facing wall radiates heat. A north side stays cold and damp. A windy corner near the street dries containers out twice as fast as a sheltered bed.
Note the fixed constraints. Property lines, easements, overhead power lines, buried utility lines, septic fields, the mailbox, and any homeowners association rules all belong on this list. Call your utility locating service before you plant a tree. Roots and sewer laterals are not friends.
Step Two: Measure the Property and Draw a Base Map
This is the step most people skip, and it is the reason most front house landscaping plans fall apart halfway through.
Take a long tape measure, ideally one hundred feet, and record the perimeter of the front yard. Measure the house itself, including the position of the front door, every first floor window, the porch, and the steps. Locate existing trees by measuring from two fixed points, such as two house corners, so you can triangulate their exact position.
Now transfer it to graph paper. Choose a scale and stay consistent. One inch to eight feet works for most suburban lots. One inch to four feet suits a small urban frontage. Larger properties may need one inch to ten feet. Write the scale on the drawing so you do not forget it later.
Draw the fixed elements first: property lines, house outline, driveway, existing walkway, mature trees, and utility locations. That is your base map. Do not draw a single new idea on it.
Instead, lay tracing paper over the base map and sketch on that. Try one version with a curved bed line. Try another with a wider entry court. Throw away the ones that do not work and keep layering. This is exactly how professionals develop a house landscape plan, and it is the cheapest design tool ever invented.
Step Three: Decide Function Before Form
Before choosing a single shrub, answer a blunt question. What does this yard need to do?
For most homes, the front yard has three jobs. It has to move people from the street or driveway to the front door safely. It has to frame the house rather than swallow it. It has to be maintainable by the person who actually lives there.
Beyond that, it can do more than you think. A front yard can hold a vegetable plot, a wildflower meadow, a small seating area, a rain garden, or a rock garden. If your lot faces a busy road, a layered screen of evergreens and a low wall can cut noise and give you back some privacy.
Circulation deserves special attention. People take the shortest route to a door. If your path curves the long way around for no reason, visitors will cut the corner and wear a track across your lawn. Either make the path direct, or plant densely along both sides so the curve reads as intentional. A main walkway should be at least four feet wide so two people can walk side by side without one stepping into the mulch.
Step Four: Match the Landscape Style to Your Home Architecture
The most effective landscape shows a clear relationship to the style of the house. Think of the planting as a frame around a picture. The frame should not compete with the picture.
Formal. Geometric bed shapes, symmetrical plantings, clipped hedges, a restrained palette of two or three colors, brick or rectangular pavers. Suits colonial and traditional facades.
Modern. Clean lines, right angles, ornamental grasses, structured masses of a single species, concrete or large format pavers. Suits contemporary and mid century modern homes.
Cottage. Curved bed edges, layered perennials, mixed colors, informal paths, a picket fence. Suits older homes with character and detail.
Ranch. Long, low, flowing beds of low growing plants that echo the horizontal roofline. Tall vertical plants fight a single story home rather than complement it.
Xeriscape. Gravel mulch, drought tolerant natives, boulders, sculptural succulents. The right answer in arid climates, and increasingly the smart answer everywhere water is expensive.
Look at your house for clues. Is the facade symmetrical or asymmetrical? Are the materials simple and understated or rich and varied? Match the landscape to the answer and it will look designed rather than assembled.
Step Five: Apply the Landscape Design Principles
You do not need a degree to design a good front yard, but you do need to respect a handful of principles that professionals never break.
Unity. Everything should read as one composition. Repeating a plant, a color, or a material across the space is what ties it together.
Proportion and scale. Plants must be sized to the house and the lot. A two story home can carry taller trees and layered plantings. A small bungalow drowns under them. For a two story house, foundation plantings should sit at least eight feet out from the wall, not squeezed against it.
Balance. Formal designs use symmetry. Informal designs use visual weight, so a single large tree on one side can balance a mass of shrubs on the other.
Emphasis. Every view needs a focal point. In a front yard, the focal point is the front door. Frame it, light it, and lead the eye to it. Do not hide it behind an overgrown holly.
Line and form. Bed edges, paths, and plant shapes direct the eye. Extend beds out from the corners of the house rather than hugging the wall, so the planting and the lawn read as one landscape instead of two.
Color and texture. A limited palette with contrasting leaf textures always looks more expensive than a scattering of every color in the nursery.
At Front Yard Landscape Ideas, we find that homeowners who commit to just three plant species and repeat them consistently end up with a better result than those who buy twenty different plants on impulse.
Step Six: Plan the Hardscape First, Then the Planting
Hardscape is the skeleton. Softscape is the skin. Build the skeleton first.
Your hardscape layer includes the driveway, the lead walk, the entry landing, steps, retaining walls, edging, boulders, containers, and any water feature. Decide their position and material on paper before you commit, because moving a paver path after installation is a demolition job, not an edit.
Two elements repay attention out of all proportion to their cost.
Edging and mulch. A crisp, defined bed edge and a fresh layer of mulch make an average planting look intentional. Mulch also suppresses weeds, holds moisture, and moderates soil temperature. Keep it two to three inches deep and never pile it against the trunk of a tree.
Landscape lighting. Low voltage path lights and a couple of uplights on a specimen tree extend your curb appeal to the twelve hours of the day when nobody can see the plants. Lighting the entry sequence is also a safety feature, not just a design flourish.
Step Seven: Build the Planting Plan in Layers
Now, and only now, do you choose plants. Work in layers, from the tallest to the lowest.
Canopy trees. One or two well placed ornamental or shade trees frame the house and anchor the whole composition. Keep them clear of overhead lines and away from sewer laterals. Check the mature height, not the nursery tag height.
Shrubs and foundation plantings. These soften the corners of the house and connect the building to the ground. Avoid the row of identical shrubs standing to attention along the wall. Group them in odd numbers, vary the heights, and leave room for three to five years of growth.
Perennials and ornamental grasses. This is your seasonal color and movement layer. Mix bloom times so something is always doing something.
Ground cover. Low growing ground covers fill the gaps, block weeds, and hide the dying foliage of spring bulbs after they finish blooming.
Two rules keep this layer honest. The first is the rule of three: short plants at the front, medium in the middle, tall at the back, which creates depth from the street. The second is mature size. Plants are sold small and grow large. Space them for what they will become, accept that the beds look thin in year one, and resist the urge to overplant.
Favor native plants wherever you can. They are adapted to your soil and rainfall, they need less water and fewer inputs, and they support local pollinators. Then aim for year round interest by combining evergreens for winter structure with deciduous plants for seasonal change.
Step Eight: Plan Irrigation, Drainage, and Maintenance
Design the maintenance in, or the maintenance will design your yard for you.
Group plants by water need, a practice called hydrozoning, so you are not drowning drought tolerant plants to keep thirsty ones alive. Drip irrigation delivers water to the root zone with far less evaporation than overhead spray. If you are keeping lawn, plan for reseeding, aeration, and a weed control approach, because weeds compete with turf for light, moisture, and nutrients.
Then be honest with yourself. How many hours a month will you really give this space? If the answer is two, design a low maintenance front yard with more evergreen structure, more ground cover, and less lawn. A beautiful plan you cannot maintain becomes an ugly yard within eighteen months.
Step Nine: Set a Budget and Phase the Work
Front of house landscaping plans rarely get built in one weekend, and they do not need to be.
A modest do it yourself project with basic plantings and light hardscape typically lands in the low hundreds to low thousands of US dollars. Once you add walkways, retaining walls, mature specimens, and lighting, the figure climbs quickly into five figures. Hiring a designer adds cost upfront but usually saves money on the build by preventing expensive mistakes.
Phase it sensibly. Year one: hardscape, grading, drainage, and the trees, because they take longest to mature. Year two: shrubs and foundation beds. Year three: perennials, lighting, and finishing detail. Seeds and small plants cost a fraction of mature stock and catch up faster than most people expect.
Common Mistakes That Ruin Front Yard Landscape Plans
- Planting first and planning never. The single most expensive habit in home landscaping.
- Ignoring mature size, which turns a tidy foundation bed into a wall of overgrowth in five years.
- Hiding the front door behind large plants, which kills the focal point and makes the entry feel unwelcoming.
- Beds pressed tight against the house with lawn running unbroken to the street, so nothing reads as unified.
- Too many species and too many colors, which produces visual clutter rather than variety.
- Forgetting the utilities, the easements, and the homeowners association rulebook.
- Designing a maintenance load you have no intention of carrying.
Conclusion
Planning front yard landscaping is a sequence, not a shopping trip. Observe the site, measure it, draw it to scale, decide what the space must do, match the style to the architecture, lay the hardscape, then plant in layers with mature size in mind. Handle water and maintenance honestly, and phase the budget across a few seasons rather than gambling it all in one spring.
Do that, and the result is a front yard that frames the house, guides visitors to the door, holds its shape through every season, and still looks right in ten years. The team at Front Yard Landscape Ideas has seen this same sequence work on everything from a narrow urban frontage to a half acre suburban lot. The scale changes. The order never does.
Frequently Asked Questions
How do I start planning my front yard landscaping?
Start with a site analysis of sun, shade, soil, and drainage. Then measure the yard and draw a base map to scale on graph paper before choosing any plants.
What scale should I use for a front yard landscape plan?
One inch to eight feet suits most suburban lots. Use one inch to four feet for small frontages and one inch to ten feet for larger properties. Note the scale on the drawing.
Should hardscape or planting come first?
Hardscape. Walkways, driveways, walls, and edging define the structure. Planting fills the structure. Reversing the order means digging up plants later.
How far from the house should foundation plantings sit?
Allow at least eight feet from the wall for a two story home, and scale down proportionally for single story houses. Always space for the plant’s mature spread, not its nursery size.
What is the focal point of a front yard?
The front door. Frame it, light it, and keep sightlines to it clear. Every other element should support that view rather than compete with it.
How much does front yard landscaping cost?
A simple do it yourself project can be done for a few hundred to a few thousand US dollars. Extensive hardscape, mature trees, and lighting push the figure much higher. Phasing the work over two or three seasons spreads the cost.
Do I need a professional landscape designer?
Not for a simple refresh. For grading, drainage, retaining walls, or a full redesign, a designer usually pays for themselves by preventing costly rework.
How do I make a low maintenance front yard?
Reduce lawn, use native and drought tolerant plants, group plants by water need, install drip irrigation, mulch generously, and rely on evergreen structure rather than high input seasonal color.

Sara Bendrick believes your yard should be a place you actually look forward to coming home to. A licensed and bonded design-build contractor (C-27 #1006161), she founded Sarita Landscape Designs and has spent over twelve years designing residential outdoor spaces across Southern California with a real soft spot for curb appeal and low-water, no-lawn designs.
When she’s not on a job site, Sara’s on camera or on stage. She’s hosted yard-renovation shows including I Hate My Yard, Build It Like Bendrick, and Lawn & Order, written Big Impact Landscapes, given two TEDx talks, and serves as a spokesperson for Stihl. Her mission is simple, help people see the potential in the yard they already have.